You can drastically boost the speed of Deep Art Effects if you have an NVIDIA GPU (graphics card) in your PC. Deep Art Effects requires from files from NVIDIA for GPU support so let’s dive in!
Deep Art Effects uses some software provided by NVIDIA to speed everything up. Whilst GPUs are historically used in games they are also very good at speeding up the things Deep Art Effects does under the hood – crunching a LOT of numbers very fast.
A GPU has hundreds if not thousands of cores. Maybe you’ve got a i7 CPU with four cores, a typical PCs GPU will usually have anything between 376 and 1,536 cores with very expensive cards having maybe 4,000+ cores. This means that when you want to do a LOT of math quickly each core can be helping out.
The software required is called CUDA and cuDNN. If you install these on your PC your NVIDIA GPU will do most the hard work the CPU usually has to handle.
CUDA 9.0
Deep Art Effects requires CUDA vesion 9.0. The latest CUDA version is 10.1, if you’ve got that installed don’t worry – you can have both versions installed at the same time, just install version 9.0 as well and everything will work perfectly.
CUDA is a BIG download, about 1.5 Gb. On a slow connection this could take 30 mins or more (better get started then)
Go to the CUDA download site and select Windows -> x86_64 -> Windows 10 -> exe (local). Download all five files.
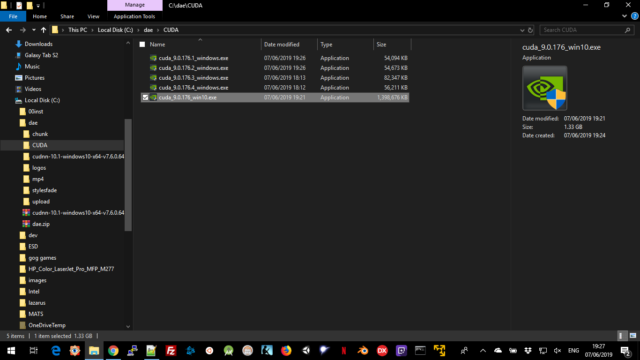
First you want to install cuda_9.0.176_win10, the really BIG one – this takes a LONG time to get to the actual installation screen. CUDA is aimed at developers and researchers so you may get some developer stuff – just ignore it.
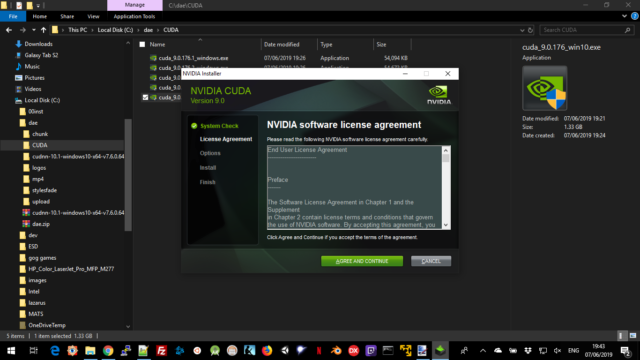
After the installer checks your PC out (it does finish – eventually) to make sure everything is correct for it you’ll get this screen and you can start installing it.
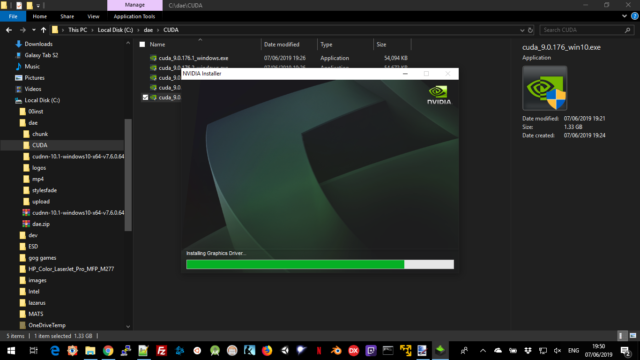
As part of the installation you may get a screen asking if it’s OK to install a driver (say Yes), this happens if the graphics driver you have is older than the one packaged with CUDA. If you’ve got the latest driver you are unlikely to see this screen (the above already has newer driver).

The last screen you’re likely to see is aimed at developers. If you’ve got Visual Studio on your PC it’ll add some libraries to that, in most cases it’ll skip that part and exit.
Now all you have to do is install the four other files in order. These are updates to CUDA since the original launch so are required. Install these files in the following order…
- cuda_9.0.176.1_windows
- cuda_9.0.176.2_windows
- cuda_9.0.176.3_windows
- cuda_9.0.176.4_windows
Now for the second part – cuDNN…
cuDNN
Open a web browser and go to the cuDNN download site.
Underneath the passage telling you what it does (techie developer stuff) you’ll find a Download cuDNN link, click on that.
As this is a NVIDIA developer site they want you to sign up. The easiest way to register with them is if you simply click the Login link,
Underneath the login form, at the very bottom, there’s a link that allows you to Login with your social account (Facebook or Google).
After you finish logging in you get to the cuDNN Download page. Agree to the Terms + Conditions by clicking the ‘I Agree…‘ checkbox and you’ll be presented with a list of downloads.
Click on the ‘Download cuDNN v7.6.0 (May 20, 2019), for CUDA 9.0‘ (it’s the bottom option) and a list of available downloads will appear. Click on the ‘cuDNN Library for Windows 10 link and save the file to your hard drive.
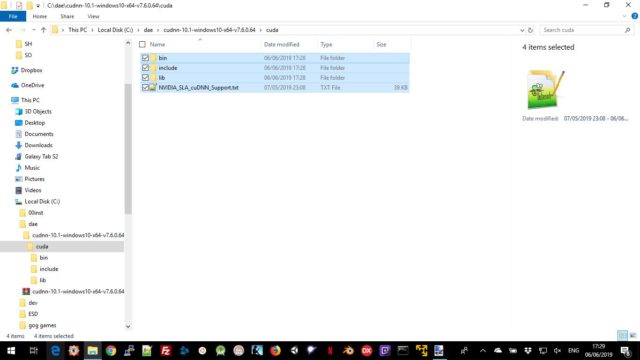
Extract the contents of the ZIP file and go into the CUDA directory. Select all the files in the CUDA directory and copy them (Ctrl-C or Right-Mouse -> Copy)
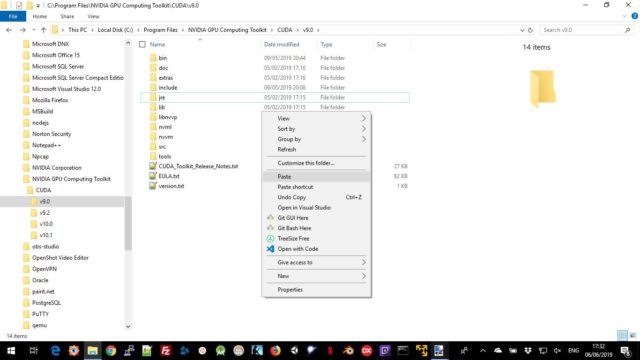
Now navigate to ‘C:\Program Files\NVIDIA GPU Computing Toolkit\CUDA\9.0‘ and paste the files you just copied there (Ctrl-V or Right-Mouse-> Paste). Yes there are some files already there, we’re just adding some new ones (or replacing old ones).
Install the Deep Art Effects GPU version
Now, if you haven’t done this already, grab the GPU version of Deep Art Effects from the website and install it.
Finally reboot your PC and see how much faster the accelerated version of Deep Art Effects is!
If you haven’t read the introductory page about the GPU speed-ups yet click here to get a glimpse of what you’re getting (an hopefully faster than the examples presented)
Checking it all worked
To check if this procedure worked correctly start up Deep Art Effects and select File -> Preferences.
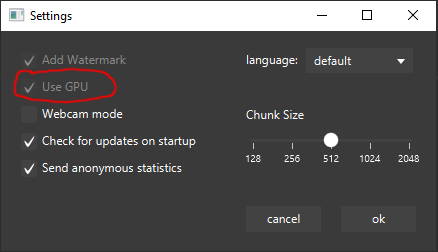
The Use GPU box marked above will have a check-mark as pictured above. The control is disabled so easy to miss – it’s a checkbox you can’t alter…
If you don’t see the GPU option try re-booting (you did reboot as it says above?). CUDA is a system driver and these things tend to require a re-boot to start working.
[wpedon id=360]
I tried uninstalling the regular version of DAE, then installed the GPU version. It does start up showing version 1.1.1, but under info, it does not say GPU version. Is there anyway to know I am actually running the GPU version?
Check out the new bit at the end of the article. That’ll tell you if the GPU is active.
Deep Art Effects – GPU usually, but not always, complains at start-up if it can’t find CUDA – you get a pop-up informing you of the fact, it’s sorta hard to miss…
Once I install the GPU version, how do I invoke it. All I see in the start menu is the regular version. Did I have to uninstall the regular version before installing the GPU version?
Yep, you need to install the GPU version of DAE
Note that StartDAE won’t work with the GPU version – yet… that’s also on my todo list