
Detailed P4D – Data Sciences Installation Instructions
A Marriage of Convenience
The recent release of a suite of Delphi components allows you to Embed a full Python Environment in a Delphi Application. It may not be obvious why you’d want to do this in the first place. To Delphi developers, the mere mention of Python will most likely immediately make them want to come up with a way to re-write the Python bit in Delphi. To Python developers, the idea of any other language may seem pointless. There is, however, something tangible to be gained for developers of either preference.
For Delphi developers, the ability to add AI facilities to their projects is the most obvious benefit. As most Machine Learning libraries are written in C/C++ and then exposed for use via Python wrappers the ability to ‘talk Python’ from Delphi instantly opens up a huge range of highly advanced libraries to which you have zero native access. While the Python layer is involved its perceived lack of speed is irrelevant as Python is merely allowing access to a fast C/C++ library so the overhead is minimal.
For Python developers, the main interface to your code is usually command-line in nature unless you use Tkinter, PyQT, or some other GUI library. However you decide to control your Python application if you plan on distributing your project for the use of others then the end user will, by necessity, need to install Python and a load of PIP/Conda packages just to get it working (there are exe compilers of course). With Delphi and the P4D components, you can add a pretty interface (it can even just issue command lines to your Python if you want) that is provided as one file. An embedded Python system is then built and populated with any packages you need the first time the application runs.

Getting in Bed with Python
The ability to at least control Python from Delphi has existed for many years via the Python4Delphi (P4D) project. P4D is, however, rather cumbersome to use and dependent on the user having a pre-installed Python Environment which somewhat detracts from the desire to use Python from Delphi. The introduction of the PythonEnvironments package and its sibling projects, however, remove many of the perceived shortcomings of Python4Delphi by allowing the deployment of a fully-fledged Embedded Python Environment along with PIP and Conda plus a growing selection of pre-packaged components via the Lightweight Python Wrappers package.
The entire system can be installed and/or started on Application startup. While the embedded Python is being installed it also downloads the Python packages required by any P4D components you’ve included in your Application making for a seamless, hassle-free way to use Python from Delphi. All this functionality is added to your program executable increasing its size by about 40MB but requiring no external files so is extremely simple to ship as the Python part of things happens invisibly to the user.
Component Suite
https://github.com/Embarcadero/python4delphi
https://github.com/Embarcadero/PythonEnviroments
https://github.com/Embarcadero/Lightweight-Python-Wrappers
https://github.com/Embarcadero/P4D-Data-Sciences
https://github.com/Embarcadero/PythonPackages4Delphi
Current Limitations
Only Delphi versions 10.4.1 or greater are currently supported for PythonEnvironments and it’s decendants
The P4D suite of projects above supports Windows, Linux, MacOS (not iOS), and Android. Windows and Linux are both currently fully functional while Mac (currently) needs an external Python and Android only supports basic Python. Lucas, who writes most of the above apart from Python4Delphi, is currently looking at improving Mac support to allow Embedded Python to work as well as improving Android (proper PIP/Conda support is problematic ATM)
The free Community Edition of Delphi supports Windows, Mac x64 (note NOT M1, etc) and Android,
The full ‘Professional’ version of Delphi adds support for the Mac Arm64 (M1, M2, etc) system and the ‘Enterprise/Architect’ versions add Linux x64 support (even Steam Deck native Linux is possible).
The Trial version of Delphi also supports everything but only for a month and a very small modification of the source is required if you want Linux x64 to run.
iOS is not supported owing to Apple disapproval of code that runs other code – technically it could be done but your chances of getting anything published are somewhat doubtful,
Arm64 Linux may be possible but an Arm64 version of PAServer would be required as would an Arm64 Linux compiler (that’s up to Embarcadero).
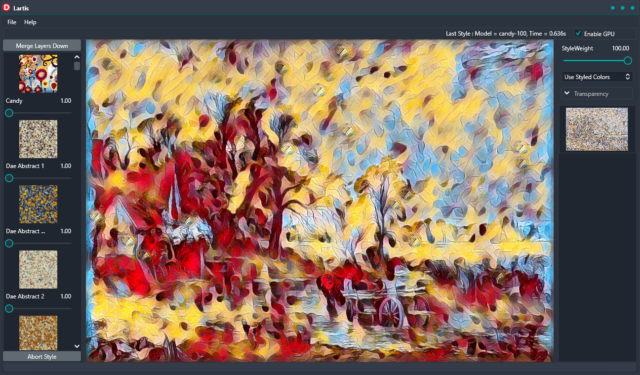
The end results of mixing Delphi with Python are extremely rewarding like this project which is basically Python Command line with a pretty front end
Getting Started
As you may be of the Python or Pascal persuasion and possibly unfamiliar with the Delphi User Interface (if you’re familiar with Lazarus this includes you) very little will be assumed other than the fact that you’re comfortable with using the command line once in a while and have some familiarity with general programming concepts – if you’re not then go read some of the basics and come back later.
If you haven’t already got them then you need to install a Git Client and a version of Delphi (Community Edition is fine), install them then come back here to continue.
Beginning Installation
The installation process for the P4D suite is easy enough once you know how to do it. If you, however, lack this knowledge everything will go wrong extremely quickly and you’ll very rapidly become frustrated and either give up or persevere – if you persevere things still won’t be ideal and they’ll mostly work (but some things won’t – which will result in more frustration and annoyance). That’s why this Tutorial is here – to show you the correct way to install everything (even experts will get some of this wrong).
First off you need to download the Component Suite. This is best performed by creating a new directory specifically for the P4D packages. It is suggested that you create a C:\Delphi directory then within that one create another called P4DSuite ending up with a directory C:\Delphi\P4DSuite. With that directory selected in Windows Explorer hold down the Shift key and Right Click on the P4DSuite directory then click on the Open PowerShell Window Here option from the pop-up menu that just opened.

Now you have a command prompt open in C:\Delphi\P4DSuite (or whatever you chose***) you can download the five packages that comprise the suite. Start off by typing (or cut & paste it)…
git clone https://github.com/Embarcadero/python4delphi
Press Enter and the very latest version of python4delphi will be downloaded from its GitHub repository into a subdirectory called python4delphi
Once that one’s done repeat the process using the following four commands (the PythonEnvironment one is the biggest)
git clone https://github.com/Embarcadero/PythonEnviroments
git clone https://github.com/Embarcadero/Lightweight-Python-Wrappers
git clone https://github.com/Embarcadero/P4D-Data-Sciences
git clone https://github.com/Embarcadero/PythonPackages4Delphi
OK, with all five repositories installed close the command-line window, you won’t need it anymore for this procedure.
*** Note that C:\Delphi\P4DSuite should be replaced with your own directory wherever you see it from now on
Installalling the Python4Delphi Suite
The following steps must be completed in the given order. Each package you are about to install after the first depends on the ones before it so the order of installation is vital and the most likely cause of installation errors. Additionally, as you install each package, Delphi needs to be told where to find the files you just built so that the packages you install after the current one know where to look for the files they in turn require.
Python4Delphi
Let’s start with python4delphi. Without Delphi, open use Windows Explorer to navigate to C:\Delphi\P4DSuite\python4delphi\Packages and you will see a screen similar to this.
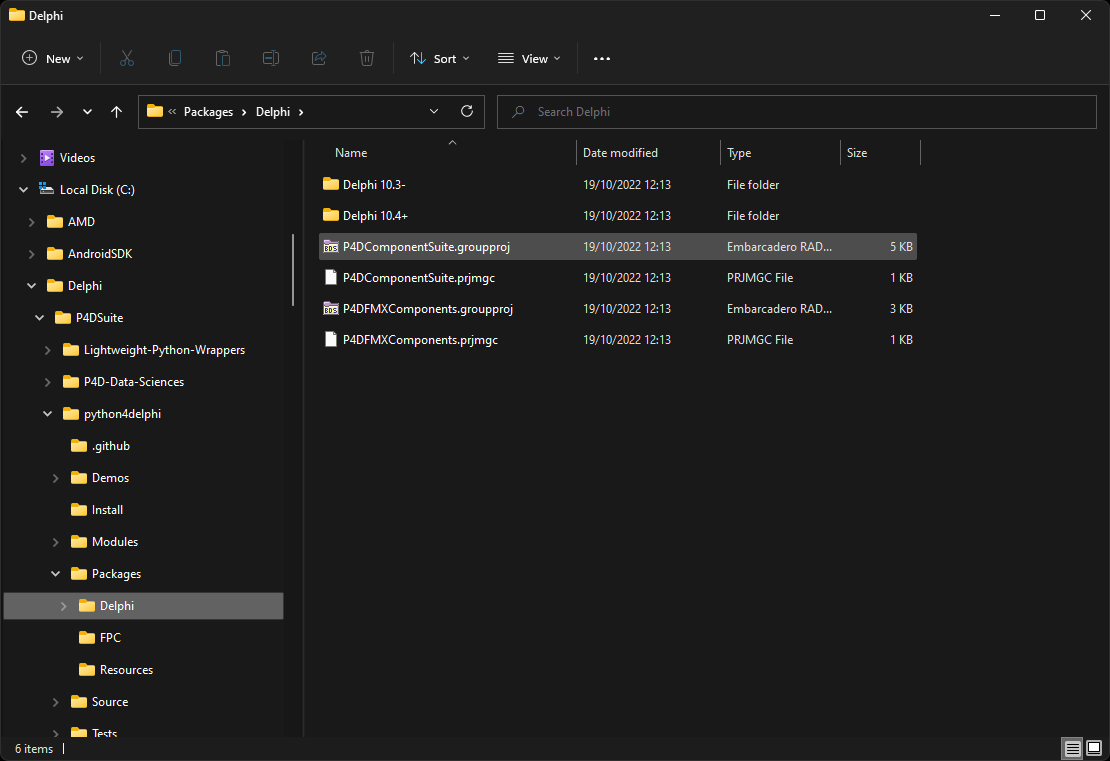
Here you will see a file named P4DComponentSuite.groupproj – this is the one you want so double click on it and Delphi will open (there is another groupproj file in this directory – its contents are a subset of the one you’re opening that skip the Windows stuff – you can safely ignore it).
On the Righthand side of the Delphi window that just opened you’ll see an ‘explorer-like’ treeview display of the files in this project group.
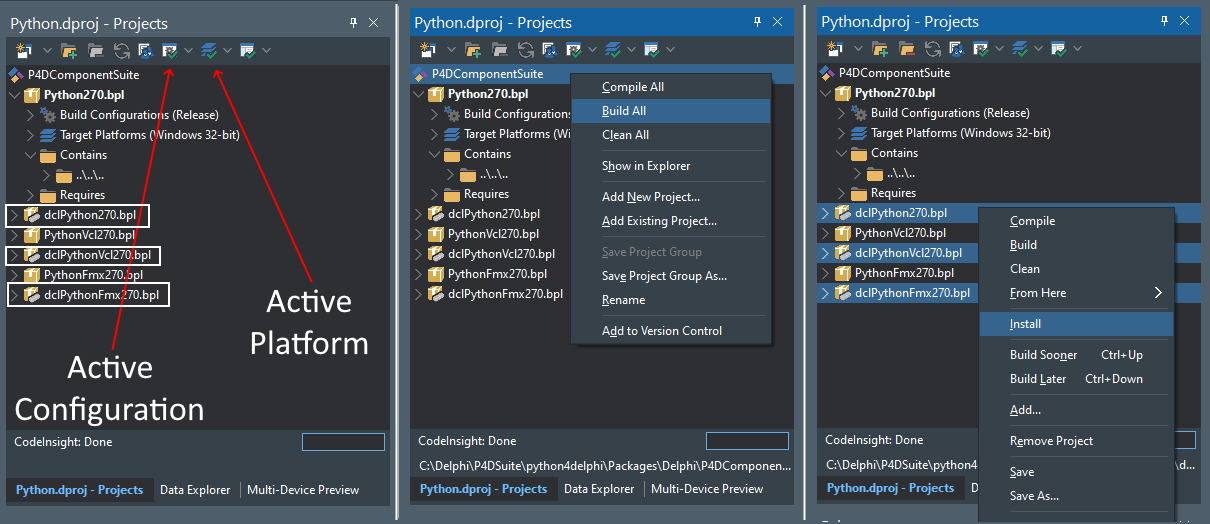
The drop-down icons in the first image allow you to select the Platform (Windows etc) and Build Configuration (Debug/Release). The build mode is currently set to Windows 32-bit Release. Even if you never intend to write or release anything for Windows 32 bit you need this version of the components as Delphi uses them extensively when building forms visually etc. The parts of the project tree on the left-hand side starting with the letters ‘DCL’ are the actual visual components you’ll drag and drop onto your form later.
As shown in the middle image above Right Click on the very top item in the list and the drop-down menu shown will pop up. Click on Build All and a window will open in the center of Delphi showing it’s progress as it builds everything. When it’s finished you can close that window by clicking the OK button (you can also check the box marked “Automatically close on successful compile” and it’ll close itself so you don’t have to)
Now click on each of the ‘dcl’…. folders while holding down the Ctrl key and all of them will become selected. Right Click and the drop-down shown in the right image will appear. Click on Install and the components in this package will be installed making them available for use later in Delphi’s Visual Editor. The installation of components should usually only be done when the project is in Windows 32-bit Release (you can install as debug but this is normally only used when writing components in the first place)
Now you have to do all that again apart from the Install part for the Debug versions of the components. To do that simply click on the Active Configuration icon marked on the left image and switch from Release to Debug. Once you’ve done that Right click on the very top item in the list Build All again, this time for the Debug versions of everything.
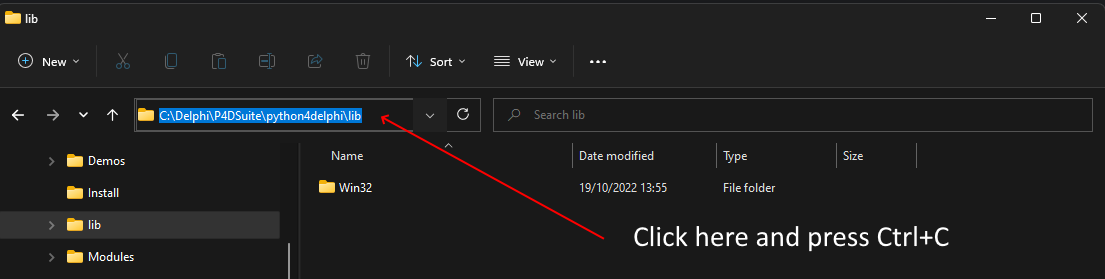
Congratulations, you’ve just installed the python4delphi package. Now you need to tell Delphi where it can find the files you just created (you created a load of files when you did the Build All and Install stuff). If you switch back to Windows Explorer you will find a new directory has been created (C:\Delphi\P4DSuite\python4delphi\lib). Click on that directory and copy its location to the clipboard (Ctrl+C) from the Windows Explorer Address Bar (this will make things a lot easier for you in a second)
From the main Delphi menu select Tools -> Options… and a new window will open. In that window click on Language -> Delphi -> Library
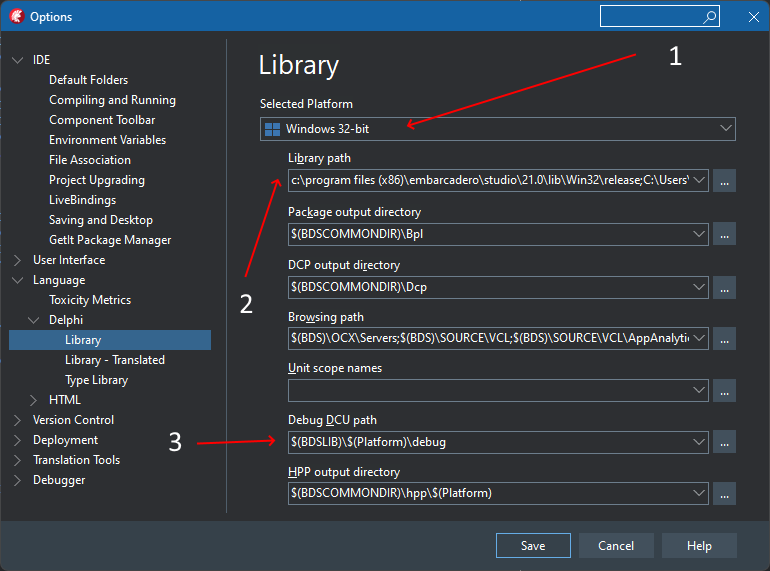
Make sure that the Selected Library (1) is the same as you just built. This should be automatic but it can get confused once in a while.
Click on the button […] at the end of Library Path (2) a dialog window will open.
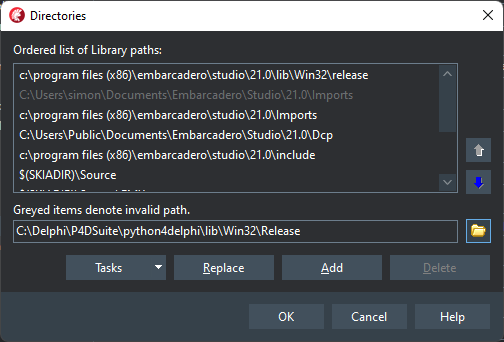
Click on the Folder icon near the bottom and a Directory Selection dialog will open. As you’ve got “C:\Delphi\P4DSuite\python4delphi\lib” in your clipboard from earlier you can save a lot of messing around by simply pasting the location into the box by pressing Ctrl+V and pressing Enter. One way or another you’re now looking at the right part of your drive. There’s a folder called Win32 here, select that then select Release (you’ll do Debug in a moment). Finally, close the dialog box by clicking the Select Folder button and your dialog box should look similar to the image above and the Add button should be clickable – so Click it to add the Release Folder to this list of directories (make sure it’s added – you should see it near the bottom of the scrollable list). Once you’re happy press the OK button and this dialog will close.
Now click the button […] at the end Debug DCU Path (3) a dialog window will open. The process here is almost identical to the one you just did – you want to add the Debug folder so click the Folder icon in this dialog and paste the path you’ve got in your clipboard to get to the lib directory then Win 32 but this time select the Debug directory and finish adding it to the directories list as you just did for the Library Paths.
You have now fully installed the python4delphi Windows 32-bit component package and Delphi knows where you put it.
Time to do Windows 64 bit…
*** Important note for Delphi Alexandria 11.2 Users Only ***
Before trying Win64 check your Library Paths for Windows 64 Release points at $(BDSCOMMONDIR)\Dcp\$(Platform) as we have noticed that the \($Platform) part may erroneously be omitted. If you have $(BDSCOMMONDIR)\Dcp set for Win64 it needs changing or the linker will try using the 32-bit library.
*** Fixed in RAD Studio 11.2 Patch #1 ***
This is basically a repeat of everything you did for Windows 32 apart from the fact that you DONT install the components this time and when you set the Library and Debug DCU paths you’ll use the Win64 Folders rather than the Win32 ones.
Switch the Active Platform to Windows 64 (the clearly marked icon fourth image above) and go through the same steps apart from the Install one and selecting the Win64 Directories when setting up paths rather than the Win32 ones. Once you’ve completed that task you’ve completed the installation of all versions of Windows available.
The observant among you will notice that there are more platforms available than just Windows and may be tempted to give it a go. Feel free to play around but note that the Install step is ONLY required for Windows 32-bit Release. It should also be noted that you may have issues with Build All, this can be avoided by only selecting the targets ending in .so or .dylib for the non-Windows platforms.
Please exit Delphi and say you don’t want to save any changes – this is useful if you ever need to install things again as everything will be the same as the instructions above say.
One down, four to go
From here on in installing the rest is basically repetition of the above with some small modifications of the above which are listed below. The packages HAVE to be installed in the correct order so you can now move on to PythonEnviroments, then Lightweight-Python-Wrappers. Once those are done the order of the final packages P4D-Data-Sciences and PythonPackages4Delphi doesn’t actually matter as these are both collections of components that use the packages you’ve already installed and are not dependent on each other.
PythonEnvironments
Switch to C:\Delphi\P4DSuite\PythonEnviroments\packages and double click on P4DPythonEnvironmentsComponentSuite.groupproj (these are easy to spot, they’re the only ones marked with type being “Embarcadero RAD Studio Project Group”
For the Library setup Cut+Paste use C:\Delphi\P4DSuite\PythonEnviroments\lib as your starting point
PythonEnvironments additionally needs C:\Delphi\P4DSuite\PythonEnviroments\src\AddOn adding to the Library Path (2) and the Debug DCU Path (3) when you get to it as a few components need that path in order to find some files they need.
Lightweight-Python-Wrappers
Switch to C:\Delphi\P4DSuite\Lightweight-Python-Wrappers\packages and double click on P4DLightweightWrappersComponentSuite.groupproj
For the Library setup Cut+Paste use C:\Delphi\P4DSuite\Lightweight-Python-Wrappers\lib as your starting point
P4D-Data-Sciences
Switch to C:\Delphi\P4DSuite\P4D-Data-Sciences (note this time it’s not in packages) and double click on P4DDataSciencesComponentSuite.groupproj
For the Library setup, Cut+Paste use C:\Delphi\P4DSuite\P4D-Data-Sciences\lib as your starting point (yes, this one is different as well)
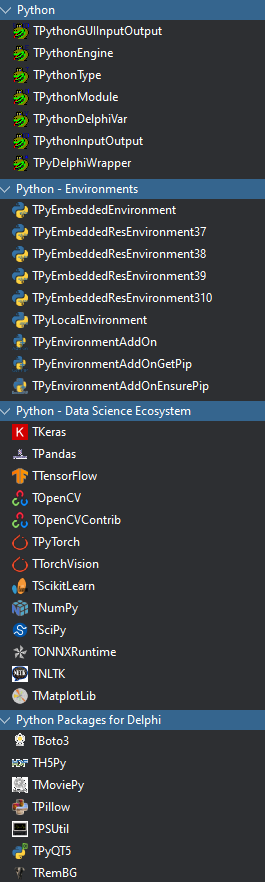
This one has a lot of components
PythonPackages4Delphi
Switch to C:\Delphi\P4DSuite\PythonPackages4Delphi (again not in packages) and double click on PythonPackages4Delphi.groupproj
For the Library setup, Cut+Paste use C:\Delphi\P4DSuite\PythonPackages4Delphi\lib as your starting point (another change)
This one has a fair few components as well
Final Sanity Check
If you did everything correctly your library dialogs should each have six entries for C:\Delphi\P4DSuite in the four Library dialog boxes like this
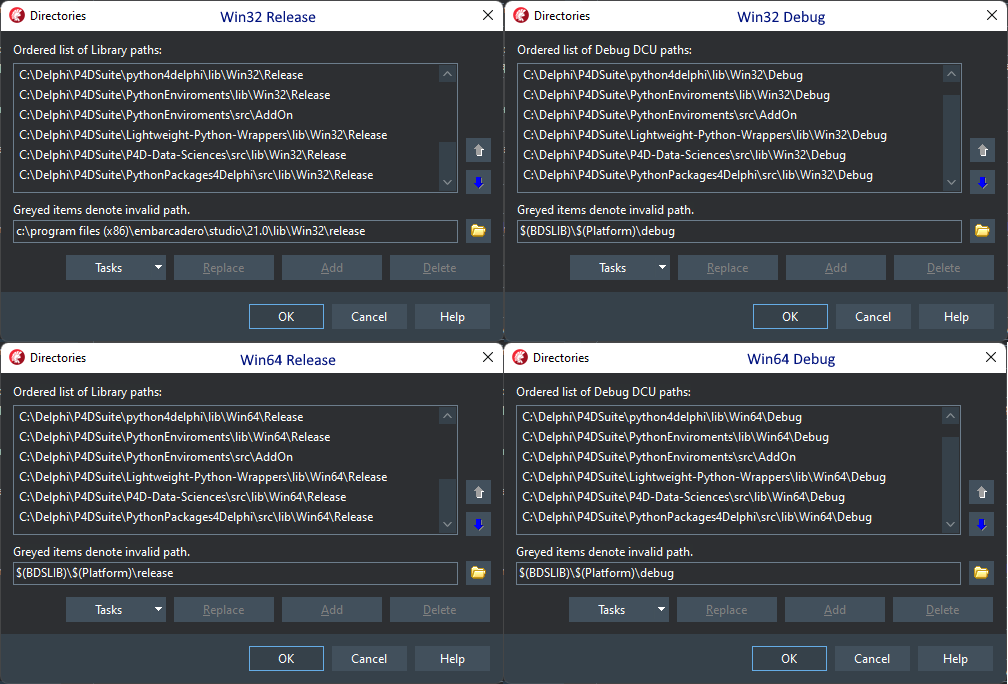
If you inspect each dialog box you will notice that, with the exception of src\AddOn, the end of the path in each case matches the Platform\Release of the dialog box you chose to open. It is highly recommended that you make sure everything looks right (i.e. as pictured above) and that you don’t have, for example, a Win32 directory in a Win64 dialog. This is very easy to do, especially if you aren’t methodical and, for example, do all the dialog boxes at once – it’s very tempting to do that, especially near the end of the installation when you’re familiar with the correct way of installing the components.
Next Steps
Well, that’ll be writing a basic application of course. Check back as there’ll be one here soon.
Your Reward for Reading This Far
We have a Discord, especially for Python4Delphi where you can come and ask Myself, @lmbelo (he writes all this), and @priyatham10 (he does a load of Python stuff for us) all about the P4D Suite

Click the Discord image above to come and chat about the P4D Suite
The End (for Now)